


We pressed “fast forward” on our Kokoda Track theme and shifted to the latter half of the campaign, when the Australians were on the counteroffensive. We opted to play the Templeton’s Crossing scenario from the Fire and Fury WW2 website. The link to the scenario is here:
http://www.fireandfury.com/scenarios/scenkokoda09.pdf

Orders of Battle: As shown in the scenario orders of battle, two Japanese rifle companies supported by heavy machine guns and medium mortars are defending against four Australian rifle companies with similar support. The Japanese platoons are at less than full strength — each platoon has a platoon command team, six rifle teams, and two knee mortar teams. Most Japanese platoons also have an attached HMG. Australian platoons are similarly sized.

(Note: In the scenarios on the F&F WW2 website, each unit is equivalent to a squad. In Flames of War, each base is a team (i.e. a half squad). Thus the easiest way to convert the scenarios from one system to the other is to more-or-less double everything within the scenario’s orders of battle, which is what we did for this game. To accommodate the extra bases, the size of the table also has to be expanded — our table was expanded to 8’X5′).

Terrain: Based on our research, we flipped the map in the scenario, so that the ford is on the left and the bridge is on the right, and all of the other terrain features are also flipped left and right. We also oriented our map so that the long axis runs north-south, with the ford being on the northern end. The Japanese are defending the western side of the valley. The creek that runs through the valley is swift and deep, and is only crossable at the bridge and the ford. Both sides of the valley are covered by jungle and are very steep. The valley is so steep that it is possible for mortar observers to see directly across to the opposite slope, hence they can call for mortar fire anywhere on the opposite side of the valley. Some areas of open ground and some areas of kunai grass complete the terrain.

Victory Conditions: At the end of Turn 12, if the Australians control all of the Japanese dug in positions that are adjacent to the track, they win. If the Australians control 2/3 of those positions, victory will go to whichever side has caused 50% greater casualties on the enemy (If neither side has done so, the game will be a draw). If the Australians fail to capture at least 2/3 of the positions by the track, the Japanese will win.

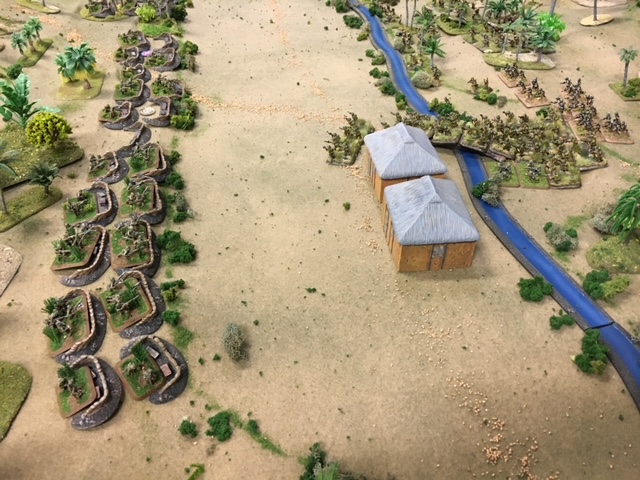
Japanese Deployment: The scenario provides four areas of prepared defensive positions for the Japanese. As shown on the map, three of those positions are spread in a line across the forward edge of the jungle overlooking the clearing by the creek, with the center of the line lying across the track. The fourth position is deeper in the jungle, along the track further up the slope. We determined that each area was large enough to provide bulletproof cover for one platoon with attachments. Most of the Japanese units are hidden at the start of the game, and the Japanese commanders were tasked to mark the positions of their units on a sketch map. The Japanese placed four platoons, each with an attached HMG, as well as the battalion HQS, within the dug in positions. One platoon was hidden in the jungle next to the ford. The remaining platoon was hidden in a reserve position behind the front line. Two medium mortar batteries were off-table, and were registered on the bridge and the ford. Only the platoon in the center of the front line was placed on the table at the start. The other the units would be revealed whenever the Japanese wanted them to move or shoot, or would be forced to appear whenever Australian units came within four inches of their location.

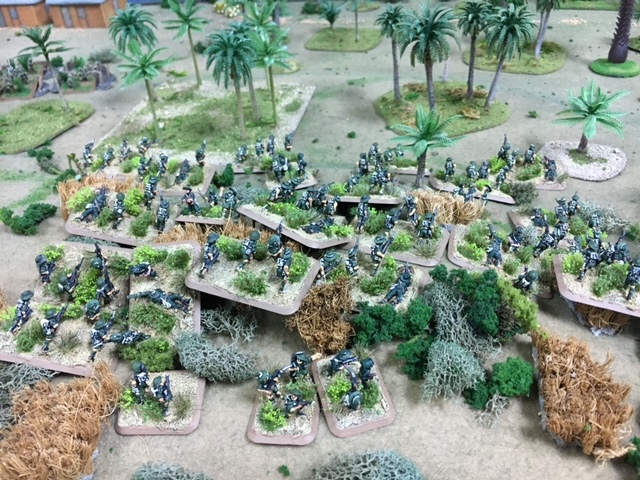
Australian Deployment: The Australians were provided with four rifle companies supported by HMGs and two medium mortar batteries. Three of these companies and the support weapons were set up east of the creek. The Australians deployed A Company at the ford, B company in the center, and C Company at the bridge. Unknown to the Japanese, D Company was making a hidden march through the jungle around the Japanese right flank, using an unmarked ford. To determine exactly when and where D Company would appear, we rolled some dice. The results were fortunate for the Australians — D Company would arrive promptly, behind the Japanese right flank. The two mortar batteries were off-table and were registered on the visible Japanese platoon.


Moves: With the first move, A and C companies began to move across the ford and the bridge. The ford was only three teams wide, and the bridge was only one team wide. Although we did not impose any other movement restrictions, the channelizing effect of the creek crossings, which was exacerbated by interdicting fire from the Japanese, created a large back up of Australian units waiting to cross. As a result, Australian platoons would be trickling across the creek for most of the game. With only one visible target, both of the Australian mortar batteries and all of their HMGs poured fire into the Japanese platoon in the center, which eliminated three teams and pinned the defenders.

On the Japanese turn, their damaged platoon unpinned, and the Japanese commanders decided to reveal three more platoons along the front edge of the jungle. The fire from their rifles and machine guns, combined with mortar strikes on both crossings, took a terrible toll of the leading Australian platoons.

The Australians responded by sending two fresh platoons forward to the crossings, while the rest of their units returned the Japanese fire. The Japanese platoon next to the ford was shown to be too exposed to superior firepower, and was ordered to withdraw deeper into the jungle and align itself with the main line of defense. Japanese fire continued to rake the Australians, and eliminated the leading platoon at the bridge.


Australian fortunes were much improved when D Company unexpectedly appeared in the Japanese rear and moved into the kunai grass behind the Japanese right flank. This company would assault and eliminate the right-most Japanese platoon. This assault, combined with the continued reduction of the central Japanese platoon, greatly reduced the defenders’ fire against the bridge crossing, and the remainder of C Company was able to start crossing the creek in force. In response, the Japanese activated their reserve platoon, sending some teams forward to occupy the vacant foxholes in the central position, while other teams went to ground in the jungle behind the central position.


On the other flank, A Company took advantage of the withdrawal of the Japanese flank guard, and began moving platoons into the jungle on the Japanese side of the creek, then began climbing the slope. However, A Company’s platoons were strung out as they advanced, and the leading platoon was taken by surprise by a sudden Japanese counterattack. This small scale assault did not cause many casualties, but it forced the leading Australian platoon to recoil back down the slope.

As the game passed the midpoint, the Australians continued to build up strength on both flanks. A Company consolidated its platoons and moved to outflank the Japanese left. D and C Companies combined to put pressure on the Japanese center. With the ford and the bridge now clear, B Company’s platoons started to cross the creek and headed toward the fighting.

The Japanese responded by revealing their final platoon in their dug in position along the track at the top of the slope. The revelation of this platoon dealt a blow to the Australian commanders’ personal morale, because they had believed that they were done finding hidden Japanese. Also, in a physical sense, this position shored up the Japanese left flank, which had been bent back 90 degrees by A Company’s advance. Although the reduced Japanese force was almost surrounded by superior numbers, the Japanese defense along the track was still holding, and time was running out for the Australians.


The final push by the Australians was able to capture the central Japanese position on the edge of the jungle, but came short of taking the dug in position in the Japanese rear. The Japanese then finished the game with a flourish, launching Banzai attacks through the jungle that pushed back the remnants of A Company on the left, and recaptured the foxholes in the center. Thus the Australians held none of the objectives at the end of the game, giving the Japanese a hard fought victory!


This was a good scenario. The Japanese were outnumbered two-to-one but were in a good position that was difficult to reach, so this was a tough one for the Australians. The hidden units on both sides definitely added spice to the game.

- TJ